Fundamentals of Yo-Yo
Before you begin doing yo-yo tricks, you must first learn the basic fundamentals of yo-yoing. Keep in mind that most of the modern yo-yos can be taken apart by the user. This feature will come in handy in case your string tangles inside your yo-yo.
To untangle your string, simply unscrew the yo-yo, take the halves apart, detangle the string, put the yo-yo back together, and away you yo.
Advertisement
Making a Yo-Yo Slip Knot
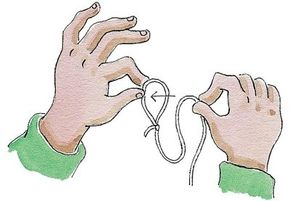
When you take your yo-yo out of the package, you'll notice that the yo-yo comes with a loop tied in one end.
Resist your instinct and do not immediately slip that loop over your finger! Instead, slip the string through that loop and make a slip knot. This is what you will place around your middle finger.
Cutting the String to the Proper Length
If you are more than 5'8", you may be able to use the string at the length it comes out of the package. However, if you are shorter than about 5'8", you'll need to shorten the string. Here's how:
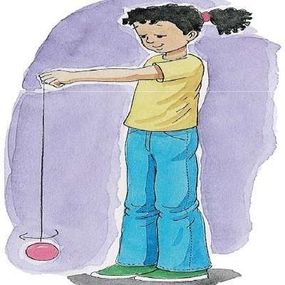
Drop the yo-yo to the floor. Put your forefinger on your belly button. Wrap the top of the string around your forefinger and tie a knot in the string, making a new loop. Carefully cut off the excess string and throw it away.
There is no "correct" string length. Some players prefer a slightly shorter string; others prefer it slightly longer. Experiment to find your ideal length. The belly button length offers a good guideline to get you started.
String Tension, or Tightness
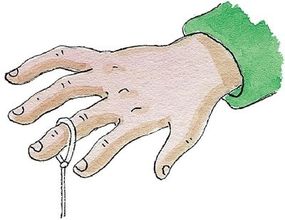
A new yo-yo string will need to be tightened to function properly. Begin by slipping the loop you made over your middle finger. Let the yo-yo drop and rest at the end of the string. If the string is too tight, the yo-yo will spin counterclockwise. If the string is too loose, it will spin clockwise.
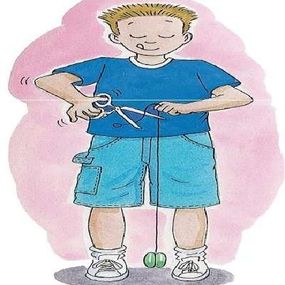
A quick way to tighten the string back to the proper state of twist is to take the string off your finger, hold the yo-yo in your hand and let the string dangle down freely. The twist in the string will quickly disappear.
Putting the String on Your Yo-Yo
After constant use, your yo-yo string will become frayed and worn. Try to change the string before it breaks. A string that gives way without warning can launch a dangerous missile and send it flying across the room, generally in a direct line with the head of the person least likely to appreciate your new yo-yo skills.
To remove an old string, first let the yo-yo hang freely. Then grab the string about three inches above the yo-yo. With your other hand, spin the yo-yo in a counterclockwise direction until the two halves of the string start to separate. Then stick your fingers in between the two halves of the string, spread the string apart, and pull the yo-yo free of the string.
To put on a new string, separate the two strands of the string at the unknotted end to create a loop. Slide the yo-yo into this loop in the string. Then twist the string by crossing the strands, allowing the string to twist around the axle of the yo-yo.
Make sure there are no kinks in the string. Most strings are generally too loose and need to be tightened before use. Let the yo-yo hang freely, then spin it clockwise to tighten the string.
Do you know your yo-yo "Circle of Danger?" Learn important tips for having fun and playing safe in the next section.