How to Make a Rocking Horse
Toddlers love to rock, and this wooden rocking horse is as much fun to use as it is to build. Give your imagination free rein when you build this fantasy friend.
Tools:
Advertisement
- Measuring rule
- Pencil
- Ruler
- Straightedge
- Scissors
- Saber saw
- Weights or clamps
- Wood file
- Drill
- Countersink
- Screwdriver
- Brace and bit
- Compass
- Paintbrushes
- Hammer
Materials:
- Brown paper
- 3/4-inch grade A-B plywood
- Carpenters' glue
- 2 x 4 and 2 x 6 pine stock
- 2-inch #12 flathead wood screws
- 1 1/2-inch #10 flathead wood screws
- 1-inch wood dowel
- Wood filler
- Primer and nontoxic, child-safe gloss paints
- Leather strips and scraps
- 1-inch and 1/2-inch studs
Time: About 2 days
Cutting the Pieces
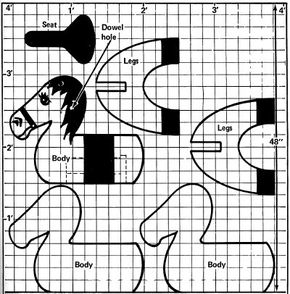
On a large sheet of brown paper, at least 48 inches square, use a pencil, ruler, and straightedge to mark off a 24 x 24-square grid of 2-inch squares. Using the cutting diagram illustrated, transfer the pattern for the rocking horse pieces onto your grid, and cut them out. For the seat and legs, trace only half of the pattern; then fold the traced piece over and cut it double-thickness, to ensure that the two halves of each piece will be symmetrical.
Use the paper patterns to trace each piece onto 3/4-inch grade A-B plywood. Use a saber saw to cut out the three pieces of the head and body, the two leg pieces, and the seat.
Stack the three head/body pieces to check them for fit; minor differences can be smoothed later. Apply carpenters' glue liberally between the three pieces, and weight or clamp the pieces together. Let the clamped pieces dry overnight.
Assembling the Horse
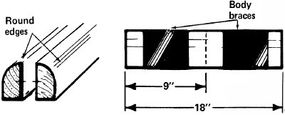
To assemble the horse, cut a 2 1/4 x 5-inch slot in each of the leg pieces to lock the legs onto the body. Cut two 9-inch-long body braces from 2 x 4 pine stock. Use a wood file to round one long edge of each brace.
Temporarily align the legs on the head/body pieces with a body brace between them; the top rounded edge of the body brace should be even with the tops of the legs. Apply glue to the side of the brace that will butt against the body of the rocking horse. Drill and countersink three holes -- two 1 1/2 inches from each end of the body brace and one centered between them -- for two 2-inch #12 flathead wood screws. Drive the screws through the brace to secure it to the horse's body. Repeat to secure the other body brace to the other side of the body.
Cut two 16-inch-long leg braces from 2 x 4 stock. Apply glue to one 2 x 4 brace where it butts with the bottom of a leg piece; the bottom edges of the brace and the leg must be flush. Drill and countersink two holes through each of the leg braces for two 2-inch #12 flathead wood screws. Drive the screws through the brace to secure it to the leg piece. Repeat to secure the other leg and leg brace.
Apply glue to the edges of the slot on the front leg piece and to the point where the leg will butt against the front end of a body brace; slip the front leg piece, brace facing to the rear, into place. Drill and countersink two holes through the front leg piece on both sides for two 1 1/2-inch # 10 flathead wood screws, and drive the screws to secure the legs to the brace. Repeat to attach the rear legs; place the leg brace facing forward.
Making the Rockers
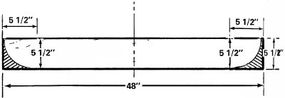
To make the rockers, cut two 48-inch pieces of 2 x 6 pine stock. Use a compass to shape each end of each piece to the curve of a 5 1/2-inch-diameter circle, so that the rockers curve up to a point at each end.
Align and center a rocker against the leg pieces on one side of the horse. Apply glue to the ends of the leg braces and the bottom part of the edges of the legs, and fasten the rocker to the legs. Drill and countersink two holes through the rocker at each point where it butts against the leg braces, for two 2-inch #12 flathead wood screws. Drive the screws through the rocker and into the leg braces.
Align the second rocker so that it matches the first one. Glue the rocker into place and secure it with wood screws, as above.
Adding the Handle
Use a brace and bit to bore a 31/32-inch hole into the head, as indicated on the cutting diagram, for the handle. Cut a 10 inch-length of 1-inch dowel, and hammer the dowel into the hole until an equal length is on both sides.
Attaching the Seat
Apply glue to the top edge of the back of the rocking horse, and set the seat into place. Drill and countersink two holes through the seat near each end for two 2-inch #12 flathead wood screws. Drive the screws through the seat and into the back to secure the seat.
Finishing the Horse
To finish the horse, fill all countersunk screw holes and any imperfections with wood filler. Use a wood file to round all rough or sharp edges, including the exposed ends of the dowel through the head. Sand the entire rocking horse smooth.
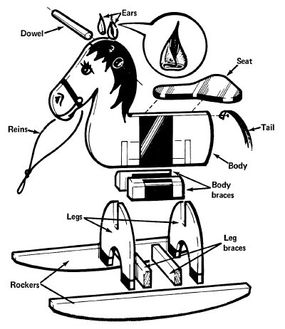
Apply a coat of primer to the entire horse and let it dry, as directed by the manufacturer. Apply two coats of paint to the horse; use nontoxic child-safe gloss paint, specified as dry-film, baby-safe. Let the paint dry thoroughly between coats. Paint the body and the details whatever colors you like -- use your imagination to paint the horse's mane, saddle, cinch, eyes, nose, and nose rein.
When the paint is completely dry, cut two 30-inch strips of leather for the reins. Attach one strip to each side of the head with 1-inch-diameter studs. Tie the other ends of the strips together and rest them on the handles.
Cut random lengths of leather for the tail. To attach each strip, pin one end of the strip through a 1/2-inch stud and hammer the stud into the rear of the horse.
To make the ears, cut two equal triangles from a 6-inch square of leather. For each ear, fold two corners of a triangle over so they overlap slightly, and secure the ear to one side of the head with a 1/2-inch stud.
Another fun toy you can build for children is a sandbox. See the next page for instructions.
For more information on do-it-yourself projects, try the following links:
- How to Choose Toys for a Child: Here you will learn about which toys are beneficial for stimulating your child’'s growth and development and which toys can be dangerous.
- How to Mend Clothes: In this article, you will learn how to make your child’s clothes last just a little bit longer by mending them yourself.
- Consumer Guide: Educational Electronic Toys: Read Consumer Guides’s reviews of the electronic toys that are available for your child.