How to Make a Sandbox
For a favorite all-summer-long toy, build this sturdy, well-put-together covered sandbox.
Tools:
Advertisement
- Measuring rule
- Pencil
- Carpenters' square
- Straightedge
- Power saw
- Hammer
- Drill
- Screwdriver
- Plane
- Sanding block
- Fine-toothed flat file
- Paintbrush
Materials:
- 3/4-inch grade A-B or B-B exterior plywood
- 2 x 4 and 1 x 2 pine stock
- 6-penny common nails
- 1 1/2-inch #8 flathead galvanized or brass wood screws
- Six utility strap hinges and four utility handles with machine screws, washers, and nuts
- Sandpaper
- Primer and latex or oil-base exterior trim paint or porch and floor enamel
Time: About 5 to 6 hours, plus finishing time
Cutting the Pieces
To make the sandbox, use 3/4-inch grade A-B or B-B exterior plywood. Be sure to make allowances for the width of saw cuts between pieces, and remember that plywood sheets may not measure exactly 4 x 8 feet.
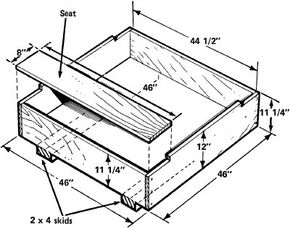
Measure, mark, and cut a bottom panel for the sandbox, 44 1/2 inches square. Cut two pieces of 2 x 4 pine stock, 46 inches long, for skids under the sandbox; angle-cut all four ends of the 2 x 4's to about 25 degrees.
Attaching the Skids
Lay the 2 x 4's parallel on a flat surface, and place the bottom panel of the sandbox on top of them, with two sides of the panel parallel with the skids. Adjust the skids so that they lie 12 inches in from each side of the bottom; set the skid ends equidistant with the edges of the bottom panel. Tack the skids into place temporarily with two 6-penny common nails driven only partway in.
Turn the bottom panel over. Drill a series of 11/64-inch holes, about 12 inches apart, through the plywood bottom panel, for screws to secure the skids. Drill only through the plywood bottom panel; do not drill into the skids. Attach the skids to the bottom panel with 1 1/2-inch #8 flathead galvanized or brass wood screws, driven through the bottom panel and into the skids. Set the screw heads flush with the surface of the wood. Turn the assembly over and remove the 6-penny nails.
Making the Sides of the Box
To make the sides of the box, cut two 12 x 46-inch plywood pieces and two 11 1/4 x 44 1/2-inch plywood pieces. At the upper corners of the 12 x 46-inch pieces, cut notches 8 inches long and 3/4 inch deep, to accommodate the sandbox's seat boards.
Set the two 11 1/4 by 44 1/2-inch pieces at opposite ends of the bottom panel; make sure the ends are flush with the open edges of the panel and the bottom edge is flush with the underside of the panel. Tack each end piece into place temporarily with two 6-penny nails driven only partway in.
Drill a series of 11/64-inch holes, about 8 inches apart, near the bottom edge of these end pieces. Drill only through the end pieces; do not drill into the bottom panel. Fasten the end pieces to the bottom panel with 1 1/2-inch #8 flathead wood screws, driven through the faces of the end pieces into the bottom panel. Set the screw heads flush.
Following the same procedure, attach the two 12 x 46-inch pieces to the other two edges of the bottom panel. Drill holes for three additional screws through the ends of these pieces; drive the screws into the ends of the 11 1/4 x 44 1/2-inch pieces. Set the screw heads flush. Remove all temporary 6-penny nails.
Making the Seats
To make the sandbox seats, cut two 8 x 46-inch pieces of plywood. Set the seats into the notches cut in the end pieces. Drill 11/64-inch holes every 8 inches along each seat, through the seat only. Secure the seats with 1 1/2-inch #8 flathead wood screws, driven through the faces of the seats into the ends of the sandbox. Set the screw heads flush.
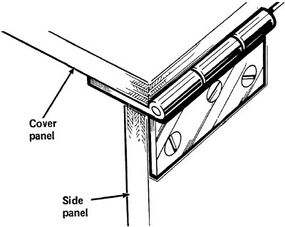
Making the Cover
For the sandbox cover, cut two 23 x 46-inch pieces of plywood. Attach three utility strap hinges to the outside edge of each piece. Using the hinges as templates, mark the locations for screw holes. Drill holes for the hinge screws through each cover piece. Secure the hinges with machine screws, washers, and nuts, with the screw heads to the inside of the sandbox and the nuts on the outside.
Mark the locations for screw holes for two utility handles near the inside edge of each cover piece. Drill holes for the handles' screws through each cover piece. Attach the handles, using machine screws, washers, and nuts.
Attach a strip of 1 x 2 pine stock to the meeting edge of one cover piece so that it will overlap the other piece when closed to seal out rainwater. Fasten the strip with 1 1/2-inch #8 flathead wood screws.
Finishing the Sandbox
To finish the sandbox, carefully round and bevel all corners and edges with a plane, a sanding block, or a fine-toothed flat file. Pay particular attention to the seat boards and the upper edges of the sides. Check for splinters or rough spots, and sand as necessary to smooth all surfaces. Finally, apply a coat of primer and at least two coats of exterior latex or oil-base trim paint or porch and floor enamel. Paint the inside, the outside, and the bottom of the sandbox. Let the paint dry completely between coats, as directed by the manufacturer.
For more information on do-it-yourself projects, try the following links:
- How to Choose Toys for a Child: Here you will learn about which toys are beneficial for stimulating your child’'s growth and development and which toys can be dangerous.
- How to Mend Clothes: In this article, you will learn how to make your child’s clothes last just a little bit longer by mending them yourself.
- Consumer Guide: Educational Electronic Toys: Read Consumer Guide’'s reviews of the electronic toys that are available for your child.