How to Make a Pinata
A piñata, the classic children's-party attention-getter, is still unmatched for inexpensive entertainment. Whether you want an ark or a space ship, an elephant or a pumpkin, it's easy to make your own.
Tools:
Advertisement
- Scissors
- Measuring cup
- Bowls
- Mixing spoon
- Saucepan
- Serrated knife
- Artists' brushes
- Ice pick
Materials:
- Large and small balloons
- Newspaper
- Flour
- Water
- Cardboard tubes from toilet paper or paper towels
- Transparent tape or masking tape
- White glue
- Poster paint or colored tissue paper
- Construction paper, crepe paper, yarn, or pipe cleaners, as desired
- Sturdy string
- Hard candy and small toys, as desired
Time: About 2 to 4 hours, plus 2 to 3 days drying time
Use a large balloon to build the piñata on, roughly the same shape you want the piñata to be. Use a round balloon for a round fruit or vegetable or a funny head; use a long balloon for a plane or ship. Make sure you get a balloon large enough to hold candy for the whole party; a diameter of 12 inches is usually adequate. To make a head, if you need one, get a 6 1/2-inch balloon. Just in case, get at least one extra balloon in each size.
Making the Papier-Mâché
The piñata is built up of papier-mâché strips smoothed over the balloon. Before you blow up the balloon, cut or tear newspaper into 1 1/4-inch-wide strips. Prepare more strips than you think you'll need; the balloon must be covered with several layers of paper. Spread newspaper on your work surface to protect it.
When you have enough newspaper strips, make a flour and water paste for the papier-mâché. Mix 1/4 cup of flour and 1 cup of cold water, pressing out all lumps; set it aside. Measure 5 cups of water into a saucepan and bring the water to a boil. Add a spoonful of boiling water to the flour-and-water paste, and stir to mix well; then, stirring constantly, slowly pour the paste mixture into the boiling water. Lower the heat and simmer for 2 to 3 minutes, stirring occasionally. Let the mixture cool.
Making the Piñata Base
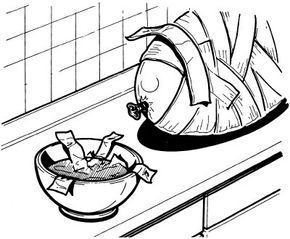
When the paste mixture is cool, blow up the balloon and close the opening firmly. If you have a bowl larger than the balloon, set the balloon into it to contain the mess.
To make a piñata with arms and legs, use cardboard tubes from rolls of toilet paper or paper towels. Cut the tubes to the desired length and tape them into place on the balloon with transparent tape or masking tape. Make sure they're anchored firmly.
To make a head for the piñata, if desired, use a small balloon, about 6 1/2 inches in diameter. Blow up the balloon and close the opening firmly. Set the small balloon into a separate bowl, and build it separately from the body. To make the head for a long-headed animal with an open mouth, such as a horse or a dog, use a toilet paper tube as a base for the papier-mâché, as described below. Add a cardboard tube to the body balloon for a neck, if desired.
Applying the Papier-Mâché
When the base of the piñata is prepared, apply the papier-mâché. Working with one strip of paper at a time, soak precut strips of newspaper in the cooled paste and smooth them onto the balloon body. Soak each strip of newspaper liberally; the paper must be thoroughly wet. Wipe off excess paste with your fingers, and smooth the wet strip onto the balloon for the piñata's body.
Repeat, soaking strips of paper and smoothing them on, to cover the entire balloon with a two-thickness layer of overlapping newspaper strips; crisscross the strips around the balloon, overlapping them about 1 inch. Leave the tied end of the balloon uncovered. If the piñata has arms and legs, cover the tubes with strips long enough to run the entire length of the tube and overlap onto the balloon; build up the tubes to the desired shape. If the ends of the strips start to come up, apply more paste and smooth them down again.
When the entire body balloon is covered with newspaper strips, cover the head balloon. Use the same technique, soaking strips of paper and smoothing them on, to cover the entire balloon with two overlapping thicknesses of paper.
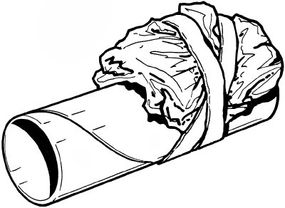
To make the head for a long-headed animal, flatten a toilet paper tube to an oval. Crumple strips of newspaper and soak them liberally in the paste; attach them to the tube with long uncrumpled strips to build up the top of the head. Add more crumpled newspaper, attached with long strips, to build the head to the desired shape; leave one end of the flattened tube open for the mouth. To complete the head, dip your fingers into the paste and apply a light coating of paste to the built-up head, smoothing the strips as you go.
Let the piñata body and head dry completely. For a stronger piñata, let the body and head dry for several hours, until the papier-mâché is stiff. Then apply another double thickness of paste-soaked strips, smoothing strips over the balloons as above; mix more paste as necessary. Let the completed piñata body and head dry for 2 to 3 days, to make sure the papier-mâché is brittle.
Decorating the Piñata
When the piñata is completely dry, put it together and decorate it. At the open end of each hardened balloon, pop the balloon and pull it out through the hole. With a sharp-pointed serrated knife, carefully cut a small hole -- about 2 inches in diameter -- in the piñata body, to attach the head; if you made a neck, this isn't necessary. Cut a corresponding hole in the head where it should join the body or neck. Don't assemble the piñata yet; you'll need the hole left by the balloon, or the head or neck opening, to fill the piñata.
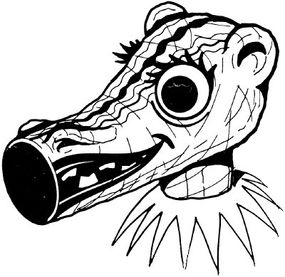
Decorate the piñata -- and, if required, the head -- with poster paint, or cover it with layers of colored tissue paper. Add construction-paper ears or wings, crepe paper streamers, or yam or pipe cleaner tails, whiskers, or hair -- use your imagination. If the piñata head has an open mouth, paint the inside of the mouth black; if it doesn't, paint on a smile or a big-toothed grin. Let the paint dry.
Finishing the Piñata
Before filling the piñata, carefully punch a small hole on each side of its top; use an ice pick, and be careful not to crush the papier-mâché. Thread a long piece of sturdy string through the holes to hang the piñata. Then fill the piñata -- and, if it's hollow, the head -- with hard or wrapped candy and small toys. Attach the head to the body with white glue; set it firmly into place, using glue liberally. Let the assembled piñata dry completely.
At party time, hang the piñata from a tree limb or rafter -- keep it low enough to be reached. Blindfold each child in turn, and give him or her a light bat or a stick; turn him around three times and then send him toward the piñata. Only one child will break the piñata, but they'll all get the prizes.
Another fun project to do with kids is to make a jigsaw puzzle. See the next page to learn how.
For more information on do-it-yourself projects, try the following links:
- How to Choose Toys for a Child: Here you will learn about which toys are beneficial for stimulating your child’'s growth and development and which toys can be dangerous.
- How to Mend Clothes: In this article, you will learn how to make your child’s clothes last just a little bit longer by mending them yourself.
- Consumer Guide: Educational Electronic Toys: Read Consumer Guide’'s reviews of the electronic toys that are available for your child.