How to Make Wooden Blocks
Wood building blocks are an all-time favorite toy, and there usually aren't quite enough to go around. With just a little effort, you can make a set of blocks for every kid in the house.
Tools:
Advertisement
- Measuring rule
- Pencil
- Carpenters' square
- Saber saw, or miter box and backsaw
- Coping saw
- Vise
- Compass
- If desired, drill
- Small paintbrush
Materials:
- 1 x 2 clear pine stock
- 1-inch wood dowel
- If desired, 1 x 3 or 2 x 2 clear pine stock, and/or 3/8-inch wood dowel
- Medium- and fine-grit sandpaper
- If desired, nontoxic, child-safe gloss paint
Time: About 3 to 4 hours; if desired, additional time for painting
Making the Blocks
To make blocks for a small child, use 1 x 2 clear pine stock. The actual size of 1 x 2 is 3/4 x 1 1/2 inches, so the finished blocks will be 3/4 inch thick, and either 3/4 inch or 1 1/2 inches wide. Use pieces of 1-inch wood dowel to cut short and long columns.
If you want larger blocks, cut them from 1 x 3 clear pine stock, for an actual width of 2 1/2 inches. Or, for square alphabet-type blocks, cut 1 1/2-inch-long pieces of clear 2 x 2 pine stock. The dimensions below are for 1 x 2 stock; modify your cutting as desired for larger or thicker blocks.
To make the blocks, measure and mark the desired length on a piece of wood; use a carpenters' square to make sure the ends are square. Mark and cut one block at a time. Clamp the piece of wood in a vise and cut each block with a saber saw; or use a miter box and a backsaw to keep the ends even. After cutting all desired blocks from the 1 x 2, cut them in half as required; then cut special shapes and pieces of dowel for columns.
Planning a Block Set
For a 58-piece block set, cut 1 x 2 and dowel pieces as detailed below.
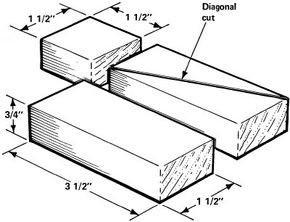
- Measure and cut 14 pieces of 1 x 2 to be 3 1/2 inches long, to make 1 1/2 x 3 1/2-inch blocks. Measure and cut four pieces 3 1/2 inches long, to be cut in half. Set them aside.
- Measure and cut 14 pieces of 1 x 2 to be 1 1/2 inches long, to make 1 1/2-inch-square blocks. Measure and cut four pieces 1 1/2 inches long, to be cut in half. Set them aside.
- Mark four 3 1/2-inch-long pieces in half the long way, and carefully cut them in half to make eight 3/4 x 3 1/2-inch blocks.
- Mark four 1 1/2-inch pieces in half along the grain of the wood, and carefully cut them in half to make eight 3/4 x 1 1/2-inch blocks.
At this point, you should have a total of 28 full-width blocks and 16 half-width blocks.
Next, make special shapes.
- Measure and cut two 3 1/2-inch-long pieces of 1 x 2, to make four triangles from two 1 1/2 × 3 1/2-inch blocks. On each block, draw a diagonal line between two opposite corners; carefully cut along the line to make two 3 1/2-inch-high triangles.
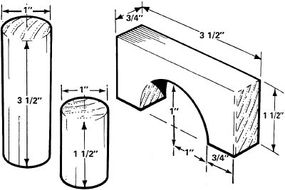
- Measure and cut two 3 1/2-inch-long pieces of 1 x 2 to make arches. For each arch, use a compass to draw a 1-inch-radius semicircle at the center of one long edge, to form a
- 1-inch-high arch on one long side. Clamp the block firmly and then carefully cut the arch with a saber saw or a coping saw.
- After cutting the triangles and arches, cut pieces of 1-inch wood dowel to make columns. Measure and cut four pieces 3 1/2 inches long and four pieces 1 1/2 inches long.
Besides the 44 plain blocks, you should now have 14 special shapes, for a total of 58 blocks. If desired, add connector pieces of 3/8-inch or smaller wood dowel to make a fit-together construction set.
For connectors of various lengths, cut 10 to 15 dowels each, 2 inches, 4 inches, 6 inches, and 8 inches long.
On the faces and around the edges of the blocks, about 1/2 inch apart, drill 3/8-inch holes about 1/4 to 3/8 inch deep. Don't drill more than two holes along the side of a 1 1/2-inch-wide block.
Finishing the Blocks
To finish the blocks, sand all edges, all corners, and all surfaces; use first medium-grit and then fine-grit sandpaper. The blocks must be very smooth; they may end up in a child's mouth. Make sure you remove all rough spots and all splinters. Remove all dust before the blocks are used.
If desired, paint the blocks -- a solid color, different colors on opposite sides, or, for square blocks, with pictures and letters of the alphabet. Use only non-toxic, child-safe gloss paint; the container should clearly state that the paint is a dry-film, baby-safe type. Apply the paint and let it dry completely before the blocks are used, as directed by the manufacturer.
To use your woodworking skills on another fun toy for children, see the next page for instructions on how to make a rocking horse.
For more information on do-it-yourself projects, try the following links:
- How to Choose Toys for a Child: Here you will learn about which toys are beneficial for stimulating your child’'s growth and development and which toys can be dangerous.
- How to Mend Clothes: In this article, you will learn how to make your child’s clothes last just a little bit longer by mending them yourself.
- Consumer Guide: Educational Electronic Toys: Read Consumer Guide’'s reviews of the electronic toys that are available for your child.