How Lampworking Works

Lampworking can be used to create smaller works, such as these beads, and larger pieces too.
Hemera/Thinkstock

Say the word lampworking, and you're likely to get some blank stares from most people outside of the glass-art community. But the work made from the technique? Everyone's familiar with that: Think of the glass beads that dangle from necklaces, the delicate glass flowers you can see at Harvard's Botanical museum and glass paperweights with intricate designs imbedded inside them. Don't let the size of these examples fool you, though -- lampworking can be used to make large pieces such as sculptures too.

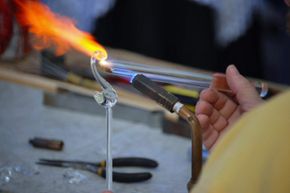
Like its more familiar cousin, glass blowing, lampworking uses a flame to heat glass and make it molten or pliable. But the two techniques are very different--and create very different end products. True, they both use heat to get glass to be bendable and shapeable. But that's about where the similarities end. Glassblowers use hollow tubes to blow air into the hot glass and expand it. Therefore, the finished products usually have air in the middle -- think of a hollow glass ornament you might hang on a Christmas tree. Lampworkers, in contrast, don't blow air into the glass, so the beads and other products they create are solid. Instead, they work the hot glass around a steel rod, letting it solidify around it.

Advertisement

This type of glasswork also goes by the name flameworking and torchworking, though lampworking seems to be the most popular term. This latter name comes from the fact that the work was once done by the flame of oil lamps. But that's not to say the art doesn't stretch back even further than that. Read on to learn why the foundations of flameworking may go all the way back to the ancient Egyptians.

History of Lampworking

Cone-shaped furnaces similar to the ceramic chimineas that dot modern-day backyards and porches have been noted in many ancient cultures. According to some lampworking historians, these furnaces could have been used to make glass beads, and in fact, many Egyptian decorative beads from more than 5,000 years ago survive today because they were considered very valuable and were often buried with their owners. Though many things about lampworking and this ancient beadworking are similar, there are differences, too [source: Mickelsen]. Obviously, the fire used way back when was not the controllable source of heat of today's torches, whose flame can be turned up or down, or positioned toward one area of the glass. So whether or not these beads can officially be called lampwork is a matter of some debate.

What is not under much question is the fact that another type of furnace, known as the beehive furnace was in use from Japan to North Africa to Rome more than 2,000 years ago. Beads were used as a kind of money back then, so the thinking is that ways of making glass would have spread as quickly as a legal do-it-yourself mint would spread today.

Advertisement

Fast-forward 15 centuries, and you'll get to the beginning of "modern" day lampworking [source: Mickleson]. That's when artists wanted to "go green" in a medieval way -- they thought the techniques available took up too much energy to make such small end products, so they started to blow air from their mouths to direct the flame from an oil lamp to heat pieces of glass. The only problem with this do-it-yourself technique was the possibility of hyperventilation. But use of hand and foot bellows (like those used to fan the flames of a fireplace) soon put an end to that problem. Galileo is one artist known to have worked with these types of lampworking devices.

The next section will tell you about how today's lampworkers do their thing.

Advertisement

Lampworking Materials: Getting Started

Lampworkers use a torch to heat the glass up enough to be able to work with it.
iStockphoto/Thinkstock

Not surprisingly, to melt glass in a modern fashion you need quite a few pieces of equipment in your workshop. Most can either be purchased at a hardware store, a welding supply store or a bead-making store. Here's a basic list:

  • Torch (aka source of fire): The simplest one is the single-fuel torch, which gives off a cooler flame than other torches -- a good thing for beginners because it means the glass softens more slowly, giving you more time to work with it.
  • Fuel tank: The fuel feeds the flame. Refillable and non-refillable tanks are available.
  • Hose, clamp and brackets (or a stand): These allow you to attach the tank to your work table and attach the tank to your torch.
  • Check valve and flashback arrestor: These are two pieces of safety equipment that make sure the flame from the torch never has a flashback, which occurs when the flame goes back in the hose toward the fuel tank, instead of out into the air. To prevent a flashback (and possible explosion), a check valve keeps gas flowing in the correct direction. A flashback arrestor also ensures gas is moving the right way and also has a component that extinguishes a possible flame -- two safety checks in one.
  • Regulators: These help you control the flow of fuel to the torch.

And then there's the art of cooling and annealing the glass -- a very important step in lampworking. If you cool the glass too quickly, it will break due to thermal shock. When glass is heated, it expands. If the glass is heated or cooled too quickly, the different layers of the glass expand and contract at different rates, causing the glass to pull away from itself, and crack or break.

Advertisement

Bob Ponton, veteran glass blower and office worker for the American Scientific Glassblowers Society, explained thermal shock this way: Think about a heating a 1-inch (2.5-centimeter) ring of glass. Heat it too fast and the temperature of the outer quarter-inch (0.6 centimeters) will rise faster than the middle three-quarters, and that outer piece will expand and break away from the middle layer, cracking the glass.

He also explained that the glass used for lampworking is different than that used for, say, making soda bottles. "Put a pop bottle in the torch, it will look like it exploded because the glass expanded so quickly," he said. For lampworking glass, boron is added to the glass to change the expansion rate, or what's known scientifically as the coefficient of expansion.

Before he retired, Ponton made glass used for scientific purposes, and he used types of glass with maybe four or five different coefficients of expansion for that type of work. For the glass art he makes, Ponton said sticks with one type of glass, as do most glass artists. One thing that changes the coefficient of expansion is the chemicals added to give the glass color, so artists look for a glass that gives them a great color palette and then learn to work with the properties of that particular glass.

There are different tools to cool hot glass, including:

  • Fiber blankets: Slip the beads between layers of the blankets to cool at a slow, safe rate.
  • Vermiculite: The same stuff used to aerate soil can also be used to cool beads. First you heat it in a crock pot or in a regular pot on a hot plate, and then push the bead into it. About 45 minutes later, you move the bead to another pail of room-temperature vermiculite.
  • Kiln: A kiln allows you to cool beads at controlled temperatures. It's also the most expensive piece of equipment associated with lampworking. Luckily it's not something a beginner necessarily needs to buy. If you make beads in a home studio, you can put a batch in a safe space and then borrow or rent time at the kiln of someone you know (such as a teacher) to anneal them.

Read on for the equipment needed for the all important steps that come between the heating and cooling of the beads.

Advertisement

More Lampworking Materials

What about the actual bead making? You'll need plenty of tools for that, too, including:

  • Glass Rods: Obviously, to make glass beads, you need glass. The glass used to make beads comes in different-colored rods. For bead making, you use soft glass, which means it melts at a lower temperature than other types of glass. For larger pieces (such as sculpture), you would use harder glass.
  • Mandrels: These are the stainless-steel rods around which the glass gets wrapped as it melts.
  • Bead-release Formula: This is a coating material you put on the mandrels so the glass doesn't stick to them.
  • Bead Reamers: If you want to thread your beads when you're done, you'll need a reamer to clean out any excess material from the beads' centers after they're made and cooled.
  • Shapers: Made of metal or graphite (so they won't melt when hot glass is pressed against them), shapers help form the beads. Anything from a kitchen knife to pliers to lampworking-specific tools such as marvers (flat surfaces on which glass is rotated) and graphite paddles can do the job.
  • Stainless steel tweezers: You'll need theseto push and pull softened glass around.

And though the saying goes "safety first," we're discussing safety equipment last. You'll need:

Advertisement

  • Protective goggles
  • Gloves (when you're working with the kiln)
  • A first-aid kit
  • A fire extinguisher
  • Leak-detection fluid, to make sure that the tubes connecting the tank to the torch are tight
  • Carbon monoxide detector
  • Quenching bowl, a heat-resistant bowl filled with water in which you can cool your tools

How exactly does one use these tools and materials? Read on to the next section for a basic how-to.

Advertisement

Lampworking Step by Step

Now for the fun part: how to actually make a lampwork bead. Here's a step-by-step guide to a very simple round bead with no embellishments or patterns:

Step 1: Heat the glass rod. To do this safely, you have to move the rod in and out of the flame so it heats slowly. Also twirl the rod so gravity plays on it equally, never letting the end droop too far.

Advertisement

Step 2: As the glass gets hot, start heating the coated mandrel as well. It should heat to an orange glow.

Step 3: As the glass becomes molten, start winding it around the heated mandrel. The glass and the mandrel should be in the flame as you do this.

Step 4: When the bead is the size you want, start pulling the glass rod away from the mandrel, continuing to rotate the mandrel the whole time. The glass will get thinner and thinner, and eventually break, a technique known as flame-cutting.

Step 5: Take the bead out of the center of the flame to its cooler edge. Continue rotating the glass. This process is called flame annealing -- it makes sure the glass' temperature doesn't drop too quickly, which can cause it to break.

Step 6: Further anneal the beads using either vermiculite or fiber blankets, and then eventually a kiln.

Step 7: Once the beads are room temperature, soak them in a bowl of water that is also room temperature. Then you can more easily remove the bead from the mandrel.

Step 8: Use a bead hole reamer to clean out the hole.

And voila! You have a bead!

So assuming you're not a super-quick study and you didn't pick up everything you wanted to know about lampworking from those eight steps, where else can you turn to learn more, maybe in person? Here are some places to check:

  • The International Society of Glass Beadmakers has a beadmaking instructors listing
  • Local glass shops may also hold classes
  • Art centers
  • Junior colleges and art colleges
  • Laurie Ament, the artist mentioned earlier learned "from a book and lots of practice!"

For more on lampworking, glass making and other related activities, blow on over to the next page.

Advertisement

Lots More Information

Related Articles

More Great Links

  • Adams, Kimberly. "The Complete Book of Glass Beadmaking." New York: Lark Books. 2005.
  • Ament, Laurie. Lampworking artist. Personal interview conducted Aug. 26 and 27, 2011.
  • Corning Museum of Glass. "Bottles" (Jan. 23, 2012) http://www.cmog.org/dynamic.aspx?id=7428#.Tlft-V3bN5Q
  • Design Museum. "Leopold and Rudolf Blaschka" (Jan. 23, 2012) http://designmuseum.org/design/leopold-rudolf-blaschka
  • Harvard Museum of Natural History. "The Glass Flowers Collec.tion." (Jan. 23, 2012) http://www.hmnh.harvard.edu/on_exhibit/the_glass_flowers.html
  • Jenkins, Cindy. "Making Glass Beads." New York: Lark Books. 1997.
  • Lampwork.com. (Jan. 23, 2012) http://www.lampwork.com
  • Mickelsen, Robert A. and Zamboli, Jennifer Frehling,"Art Glass Lampwork History."(Jan. 23, 2012) http://www.theglassmuseum.com/lampwork.html
  • The Museum of Modern Art. "Vera Lisková." (Jan. 23, 2012) http://www.moma.org/collection/browse_results.php?criteria=O%3AAD%3AE%3A3568&page_number=&template_id=6&sort_order=1 The Natural History Museum. "Blaschka Glass Model." (Jan. 23, 2012) http://www.nhm.ac.uk/nature-online/life/other-invertebrates/radiolarians/about-blaschka-models/index.html
  • Ponton, Bob. Lampworker and office worker for the American Scientific Glassblowers Society. Personal interview conducted Sept. 29, 2011.

Advertisement

Loading...