While the strength and skill of great ice skaters is immediately obvious, it's easy to overlook the remarkable surface that makes it all possible. But as it turns out, varying the characteristics of indoor ice just a little bit can make the difference between a gold-medal performance and an embarrassing spill.
Indoor ice rinks are used for all sorts of sports and recreational activities, including hockey, figure skating and speed skating. In all of these sports the quality of the ice makes a big difference.
Advertisement
Forming a good skating surface isn't as simple as making a tray of ice cubes. Freezing a rink correctly takes no less than a dozen stages, with some stages laying ice that may be as thin as 1/32 of an inch (0.8 millimeters). Some layers require paint to create an attractive background and, in the case of hockey, provide clear markings. And ice that's best for one sport may be completely unacceptable for another.
In this article, we'll visit with Don MacMillan, ice supervisor for the RBC Center and the NHL Carolina Hurricanes. We'll also learn about the history of indoor ice rinks, the creation of a new ice surface, the rink's characteristics and logistics, and rink maintenance.
If you’re interested in ice skating and other cold weather activities, read about ice climbing and check out a video from Discovery’s Fearless Planet.
Thank You
Thanks to the Carolina Hurricanes, Chris Brown, and "ice man" Don MacMillan for their assistance with this article.
Years before hockey or the Winter Olympics, ice skating was a means of getting across the frozen waterways in northern Europe. It was only when ice became available year-round that sports such as hockey and figure skating took off.
The success of modern ice rinks owes a lot to Lester and Joe Patrick, two brothers who created hockey leagues in Canada in the early 1900s. On Christmas Day 1912, the brothers opened Canada's first indoor ice rink in Victoria, Canada. The arena cost $110,000 to build and seated 4,000 people. Three days later, the Patrick brothers opened another arena in Vancouver, Canada. This was a more expensive arena -- $210,000 to build -- and it could hold more than 10,000 people. Underneath the ice was the world's then-largest refrigeration and ice-making system.
Advertisement
Over the next few decades, the Patricks were responsible for creating arenas all across the northwest United States and throughout western Canada. Today, the United States has more than 1,700 ice rinks. New arenas today can cost hundreds of millions of dollars to build.
The main difference in an ice rink, other than sheer size, is that the refrigerant doesn't cool the ice directly. Instead, it cools brinewater, a calcium-chloride solution, which is pumped through an intricate system of pipes underneath the ice. In most rinks, the pipes are embedded in a concrete or sand base (more on this later).
Some Ice Milestones
1876: The first indoor ice rink opens in London. The ice is made through an expensive process of sending a mixture of glycerin and water through copper pipes.
1879: The first indoor ice rink in the United States opens in Madison Square Garden in New York City, NY.
1908: The first Olympic figure-skating competition is held on a refrigerated indoor rink as part of the Summer Games in London.
1976: Ice dancing becomes a Winter Olympics sport.
The Floor
At the Raleigh arena, Don MacMillan uses two large water filtration systems to produce deionized water, which is essential for making clear ice.
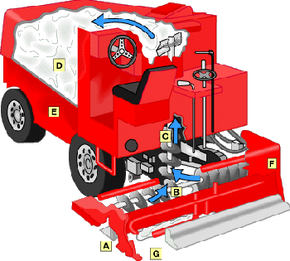
Underneath the floor at the Raleigh arena, you'll find a refrigeration system like the one shown below. This system consists of three main pieces:
Advertisement
Chillers (the Raleigh arena has three)
Steel pipes with 2,800 pipe welds
Brinewater (an antifreeze agent)
Five miles (8 km) of steel pipe wind under the rink in the Raleigh arena (A). The three chillers cool the brinewater to 16 F (-9 C) and provide up to 270 tons of cooling (see How Air Conditioning Works for the definition of a "cooling ton"). The brinewater's chemical makeup keeps it from freezing.
The maintenance team sets the refrigeration system's temperature manually, based on indoor and outdoor temperatures. To freeze the rink surface, the system pumps 9,000 gallons (34,000 L) of freezing brinewater through the pipes and then onto the ice-bearing concrete slab.
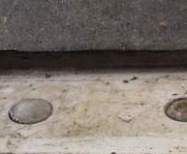
The brinewater is pumped (B) into the pipes embedded in the ice-bearing concrete slab (C). The ice-bearing slab sits between the skating surface (D) and a layer of insulation (E), which allows the ice to expand and shrink as temperatures and time demand. The brinewater helps keep the ice-bearing slab's temperature just below 32 F so that the water spread onto it can freeze.
Underneath the layer of insulation, a heated concrete layer (F) keeps the ground below the ice from freezing, expanding and cracking the rink structure. The entire rink sits on a base layer of gravel and sand (G) which has a groundwater drain at the bottom.
To defrost the skating surface, the brinewater is heated and pumped through the ice-bearing concrete slab. This heats the under layer of the ice, making it easier to break up and remove with front-end loaders.
Rink Logistics
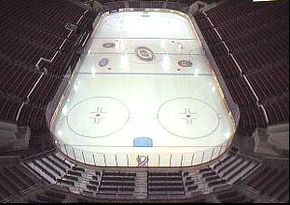
For non-skating events, the ice is covered with insulating pads.
Since the Raleigh arena is home to the Carolina Hurricanes, the rink must meet all NHL regulations. This includes shape and size requirements, surround requirements, maintenance requirements and temperature requirements. Even during non-hockey events, the rink must be properly maintained.
Even during most non-skating events, the ice is always there. MacMillan explains that the conversion process is fairly complex. "For NC State basketball games, we make an ice deck using 4-by-8 sheets of plywood to cover the ice. Then we put the basketball floor over that. For non-hockey shows, we also take down the glass surrounding the rink. It takes six to eight hours to change from the ice rink to the basketball court." MacMillan says the ice is only broken up and hauled out "for the circus, because they make points in the floor to hold the trapeze and other things, or for a truck pull."
Advertisement
Rink Shape & Size
Rink Shape & Size
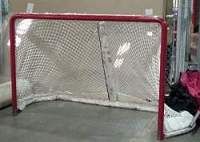
An NHL goal net measures6'W x 4'H x 44"D.
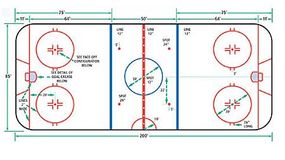
An official NHL rink measures 200 feet (61 m) in length and 85 feet (26 m) in width, with corners rounded to a 28-foot (8.5-meter) radius. The end zone width is 11 feet (3.4 m), and the zone between the center blue lines is 50 feet (15.2 m).
For hockey purposes, the rink has various painted markings (we'll discuss paint in detail later), as shown in the image below. These images include the goal lines and creases, blue lines, red center line, face-off circles, and face-off spots -- each of these must be carefully measured to fit within that 200-foot by 85-foot space. The goal net is 4 feet (1.2 m) high and 6 feet (1.8 m) wide, and is only 44 inches (112 cm) deep.
Photo courtesy NHL
Rink Surrounds
The NHL Rulebook dictates that for hockey games, the rink is surrounded with boards above the playing surface and glass above the boards.
The boards provide valuable sponsorship opportunities.
The boards are a continuous wooden or fiberglass wall, often used as advertising space. The boards sit on top of the ice surface and are ideally 42 inches (107 cm) high. Except for the official league and team markings, the entire playing surface and the boards are painted white. The kickplate at the bottom of the boards is light yellow. The boards are constructed so that the surface facing the ice is smooth and free of any obstruction or any object that could cause injury to players. The doors in front of each team's bench and the penalty box open inward, away from the playing surface, to prevent injury to players.
The glass that surrounds the rink for hockey games is very important because it protects the fans from line-drive pucks, and it protects the players from the fans. In addition to protecting the fans, players, and playing surface, MacMillan says that keeping the glass up around the rink while the floor is being flooded helps it set up faster. "It keeps the cool air in, allowing it to freeze quicker. Otherwise, all the cool air floats out into the seats."
There are two types of glass:
Tempered glass groovePlexiglas groove
Tempered glass - The sides of the rink (as well as the team benches and penalty boxes) are lined with seamless, tempered glass. Although the primary purpose of the tempered glass is to provide an unobstructed view for the fans, it can also better withstand the force of a player or a slap shot slamming into it. Tempering is an annealing process, involving successive heating and cooling, and makes glass harder and less brittle. The pieces of side glass, each 6 feet tall and 5/8 of an inch (1.6 cm) thick, fit together smoothly.
Plexiglas - The ends of the rink are lined with Plexiglas -- acrylic plastic sheets. The end glass is 8 feet (2.4 m) tall and a 1/2 inch (1.3 cm) thick. The Plexiglas sheets are fitted together with supports that are mounted on the outside edge of the boards, so they don't interfere with play.
According to MacMillan, many players -- if they had to choose -- would rather be checked against the Plexiglas than the tempered glass. "Because the Plexiglas is held together by supports, it gives a little more than the tempered glass does."
The Ice
Making an ice rink isn't as simple as flooding the floor with gallons of water. The crew must apply the water carefully and slowly, in order to insure ideal thickness. An ice surface that is too thick requires more energy to keep frozen and is prone to getting soft on the top. A surface that is too thin is also dangerous because skaters risk cutting straight through the ice.
It takes between 12,000 and 15,000 gallons (45,000 to 57,000 L) to form a Hockey rink surface. The maintenance crew forms the ice in several different layers, in many steps:
Advertisement
The crew sprays the first two layers on using a paint truck. The paint truck creates a fine mist of water to create the first two layers, each only 1/30 of an inch thick. The first layer freezes almost immediately after it is sprayed on.
Once the first layer is frozen, the crew sprays on the second layer.
The crew paints the frozen second layer white with the paint truck, allowing for a strong contrast between the black hockey puck and the ice.
The crew then sprays on the third layer. This layer, which is only one-sixteenth of an inch thick, acts as a sealer for the white paint. The crew paints the hockey markings (the lines, creases, face-off spots and circles) and team and sponsor logos on top of this third layer.
Once the markings and logos dry, the crew gradually applies the final layer.
The crew slowly applies the remaining 10,000 gallons with a flooding hose. "We put on 500 to 600 gallons per hour until the remaining layer is complete," says MacMillan. "That means 15 to 20 hours (1 hour/500-600 gallons) for that final layer. Each of those layers is allowed to freeze before we put the next 500 to 600 gallons on. The less water you put on the floor at one time, the better your ice will be."
Temperature: Good Ice vs. Bad Ice
When creating a new ice surface, indoor conditions are very important. MacMillan says he likes to "keep the skating surface at 24 to 26 F (about -4 C), the building temperature at about 63 F (17 C), and the indoor humidity at about 30 percent. But if it's warm outdoors and we have an event where the doors are open and all that warm air comes in, then we have to adjust it. Even one degree can make a big difference in the quality of the ice."
An indoor high humidity can create a fog over the ice. The Raleigh arena has more than 770,000 square feet, and requires 12 dehumidifiers throughout the building to keep the air dry indoors. The outdoor temperature can also affect the ice conditions. The arena and ice temperatures must change to compensate for the heat and humidity that will come in when the arena doors are opened to fans and spectators.
Many NHL players have expressed concerns about ice conditions in very warm-weather cities during the Stanley Cup playoffs. They fear the outdoor temperature may be hot enough to soften the ice inside the building. In Canada, the problem is just the opposite. The buildings often have to be heated because the extremely low temperatures outside can cause problems with the ice.
Ice conditions can vary greatly with a temperature change as small as one degree. The type of water also can change conditions. For example, ice made with water that contains dissolved alkaline salts may have a sticky feel to it and will dull skate blades. To counteract these problems, many rinks -- including the Raleigh arena -- use water purifiers or add chemical conditioners to tap water.
Figure skaters and hockey skaters have different ideas of what good ice and bad ice are. Figure skaters prefer an ice temperature of 26 to 28 F. Ice in that temperature range is softer, so it grips the skate edges better. It is also less likely to shatter under the impact of jumps. Hockey players, though, prefer colder, harder ice. With many skaters on the ice simultaneously, it's easy for the ice surface to get chewed up at the temperatures preferred by figure skaters. For hockey games, the top of the ice is usually kept at 24 to 26 F. Ice that's too warm might cause players to lose their edge during a crucial play, but ice that's too cold may chip too readily.
For more on the physical properties of ice, visit this page.
Green Ice?
Brand new ice is called "green ice" because it hasn't been broken in yet.
Painting the Ice
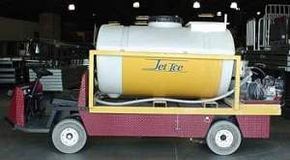
The Hurricanes are one of only a few NHL teams with a paint truck.
The Hurricanes use Jet Ice water-based paint for the ice surface, lines, and logos. The white paint used for the ice surface comes in 40-pound bags of powder that have to be mixed with water. The blue, black, red and yellow paints used for the lines and logos come in pre-mixed containers.
The Jet Ice paint truck that spreads the water-based paint is the same one that spreads the thin layers of water that make up the skating surface. "Not many teams have these paint trucks," says MacMillan. "It certainly makes the job easier." The paint truck resembles the first-aid carts that many major league football and baseball teams use, with the driver's seat in front of a flat bed. The flat bed carries a 300-gallon tank that can be filled with either water-based paint or water. The tank is hooked up to pump that drive the liquid out and through the pipes to the sprayers.
Advertisement
Sprayers ensure even coats.
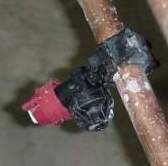
At the back of the machine, you'll find a piece of detachable, hollow copper pipe, shaped into a long, rounded rectangle. Along the bottom side of the copper pipe, you'll find the sprayers -- plastic, removable nozzles attached to the hollow copper wand. The pipe fills with paint (or water) and allows each sprayer to spread a fine mist so that the paint (or water) will set-up quicker.
"After the first layer of ice is put on, we paint the entire rink white, using 300 gallons (about 1,100 liters) of water-based white paint, then another layer of ice," says MacMillan. The lines are painted by hand, and we use stencils for the Hardee's star and the Hurricanes logos. Then we put a third layer on to seal the paint, and then the rest of the ice surface is spread."
Maintaining the Rink
No matter how well-groomed the ice rink, the ice will eventually be cut and pitted, and dust and bugs will dull it. The ability to quickly and effectively resurface the ice is as important to skating as the development of indoor ice itself.
The Raleigh arena has two Olympia ice-resurfacing machines, a Model 2000 and a Model 3000. The Olympia ice-resurfacers that MacMillan uses are powered by two propane tanks, and have V-8 Chevrolet engines and four-wheel drive. Each machine lasts about five seasons and provides more than 2,000 floods each year!
Advertisement
There are three things in life that people like to stare at: One is a rippling stream, another a fire in a fireplace, and the other is the Zamboni going around and around and around.
-- Charlie Brown
Ice-Resurfacing Machines
Before ice-resurfacing machines, ice rinks were resurfaced manually, using scrapers, towels, a water hose and squeegees. Resurfacing a regulation-size rink was time-consuming and labor-intensive. In the 1940s, Frank Zamboni began to experiment with building machines that would shave, scrape, wash and squeegee the ice surface all at once before putting down a fresh layer of water.
Early ice-resurfacing machines cost about $5,000 and were built by hand on war-surplus jeeps. Today, ice-resurfacing machines cost significantly more (about $55,000), are mass-produced, and every rink has at least one. Professional hockey teams, including the Carolina Hurricanes, routinely use two machines to cut down on the time needed to resurface the ice between periods. Most ice-resurfacing machines have a maximum speed of 9 to 10 mph (14 to 16 kph) and weigh between 5,000 and 6,000 pounds (2,300 to 2,700 kg)!
The NHL requires that two machines resurface the ice between periods. The ice is resurfaced before the game, after warm-ups, between periods, during playoffs, and when the game is over. With two resurfacing machines, it takes three minutes to complete the floor, each making four full passes up the ice. With one, it takes between six and seven minutes with eight full passes up the length of the ice.
The basic driving pattern is a clockwise motion of slightly overlapping ovals. MacMillan says that he uses 80 to 100 gallons (300 to 380 liters) of heated water between periods to resurface the ice. "With both machines," says MacMillan, "we can scrape about three-quarters of a bucket during each game."
While MacMillan's Olympia machines have an 84-inch long, 1/2-inch thick blade, most Zamboni machines (like the one in this diagram) have a 77-inch long, 1/2-inch thick blade (A). The blade scrapes a 1/16-inch to 1/8-inch layer of ice off the ice surface. The blade runs the width of the machine and looks like a thick razor blade. The amount of ice taken off depends on the ice conditions. The rougher the ice surface (i.e., the more use it has had), the deeper the blade cuts.
Just above the blade is a horizontal, rotating screw, or auger (B). The auger gathers the shaved ice, or snow, and rotates it up to a vertical auger (C), where a spinning blade picks up the moving snow and throws it into the bucket (D). The bucket can hold an amazing 2,600 pounds (or 300 gallons) of snow!
Under the bucket, there are two tanks of water, one for "washing" the ice as it's shaved and one for making ice. As the resurfacing machine moves over the ice, the blade shaves layers of the ice off. Water from the wash-water tank (E) is pumped over to a cleaner (F) that blasts the water into the deep cuts in the ice and forces out dirt and debris. The excess water left on the ice is squeegeed off with a rubber blade (known as a towel) at the back end of the machine (G) and vacuumed up. The hot water loosens the crystal structure of the old ice underneath, so the new ice will form a solid bond with the old ice, instead of a separate layer that chips off easily.
The last step is to resurface the ice. Warm water from the second water tank is pumped over to the squeegee blade and spread evenly over the ice. This softens and fills in the deep cuts in the ice and helps to even out its surface.
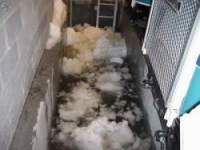
Snow pit
After the final pass on the ice, MacMillan returns the machine to its garage. At this point, the snow bucket is raised and the snow is dumped into the snow pit. As the snow melts, the pit is drained.
Now that you know about ice rinks and ice-resurfacing machines, you'll never look at them the same again. On a hot summer day when you go to the arena, you'll understand why the building is so cool and how the ice stays frozen!
For more information on ice, ice rinks and related topics, check out the links on the next page.
Zamboni
Today, like "Kleenex" for tissue and "Xerox" for photocopying, most people often incorrectly refer to all ice resurfacing machines as s regardless of the machine's manufacturer.