For more information on do-it-yourself projects, try the following links:
How to Choose Toys for a Child: Here you will learn about which toys are beneficial for stimulating your child's growth and development and which toys can be dangerous.
How to Mend Clothes: In this article, you will learn how to make your child's clothes last just a little bit longer by mending them yourself.
Consumer Guide: Educational Electronic Toys: Read Consumer Guide's reviews of the electronic toys that are available for your child.
We will get started on the next page by showing you how to make a childhood favorite -- play dough.
Advertisement
Looking for More Creative Toys?
Learn more about developing and teaching creativity with creative toys from Consumer Guide Products.
What child doesn't enjoy modeling? This smooth-textured, easy-to-shape dough is far superior to the expensive brand-name variety. It's simple enough to let the kids help with the "cooking."
Equipment:
Advertisement
Large mixing bowl
Fork
Measuring cup
Measuring spoons
2-quart saucepan
Locking plastic bag or air-tight container
Ingredients:
Flour
Salad oil
Alum
Water
Salt
Food coloring as desired
Yield: 3 cups
In a large mixing bowl, combine 2 cups of flour, 2 tablespoons of salad oil, and 2 tablespoons of alum; stir with a fork to moisten the dry ingredients evenly. Set aside. Measure 2 cups of water into a 2-quart saucepan; add 1/2 cup salt and food coloring as desired. Heat to a boil and simmer, stirring occasionally, until the salt dissolves.
Add the hot water solution to the flour mixture in the bowl and stir to blend thoroughly. Let cool slightly; then knead the dough until it's soft and pliable. Store dough between uses in a locking plastic bag or an air-tight container.
If your child feels like switching media -- or even doing mixed-media -- see the next page for instructions on making your own poster paints.
For more information on do-it-yourself projects, try the following links:
How to Choose Toys for a Child: Here you will learn about which toys are beneficial for stimulating your child’'s growth and development and which toys can be dangerous.
How to Mend Clothes: In this article, you will learn how to make your child’'s clothes last just a little bit longer by mending them yourself.
Consumer Guide: Educational Electronic Toys: Read Consumer Guide’'s reviews of the electronic toys that are available for your child.
More on Making Toys
Can you do a home improvement project by yourself? Norma Vally thinks so. Tune in to "Toolbelt Diva" on the Discovery Home Channel and find out what you can fix on your own.
How to Make Your Own Poster Paints
You can create a bright spectrum of poster paints unmatched by the store-bought variety, and for half the cost. The main ingredient is powder paint, sold in hobby shops and the art supply sections of department stores.
Equipment:
Advertisement
Small saucepan
Measuring cup
Mixing spoon
Small jars with covers
Measuring spoons
Ingredients:
Water
Flour
Powder paint
Clear liquid detergent
Liquid laundry starch
Yield: 4 small jars of poster paint
Buy a variety of powder paints so you can mix several colors. The three primary colors -- red, yellow, blue -- and white are good basics; go on from there to mix whatever colors you like.
In a small saucepan, slowly add 1 cup water to 1/4 cup flour, stirring constantly. Cook over medium heat, stirring constantly, until the paste begins to thicken. Remove from heat and cool.
Use a small jar with a cover for each color desired. Measure 1/4 cup paste into each jar and add 2 tablespoons of water. Add 3 tablespoons of any color of powder paint, and mix well. If the mixture seems too dry, add water, 1/2 teaspoon at a time; stir well after each addition. For a glossy finish, add 1/2 teaspoon of clear liquid detergent to each jar; for an opaque finish, add 1/2 teaspoon of liquid laundry starch.
Cover the jars tightly; stir before each use.
Quick detergent paints. For instant poster paints, mix 2 teaspoons of powder paint with 1 tablespoon of clear liquid detergent for each color desired. Stir well.
You can use this poster paint for all kinds of projects. For instance, you can use them to decorate a piñata you make yourself using our instructions on the next page.
For more information on do-it-yourself projects, try the following links:
How to Choose Toys for a Child: Here you will learn about which toys are beneficial for stimulating your child’'s growth and development and which toys can be dangerous.
How to Mend Clothes: In this article, you will learn how to make your child’'s clothes last just a little bit longer by mending them yourself.
Consumer Guide: Educational Electronic Toys: Read Consumer Guide’'s reviews of the electronic toys that are available for your child.
How to Make a Pinata
The piñata is built up of papier-mâché strips spread over a balloon base. Saturate the strips thoroughly and smooth them evenly over and around the balloon, overlapping them about 1 inch. Leave the tied end uncovered.
A piñata, the classic children's-party attention-getter, is still unmatched for inexpensive entertainment. Whether you want an ark or a space ship, an elephant or a pumpkin, it's easy to make your own.
Tools:
Advertisement
Scissors
Measuring cup
Bowls
Mixing spoon
Saucepan
Serrated knife
Artists' brushes
Ice pick
Materials:
Large and small balloons
Newspaper
Flour
Water
Cardboard tubes from toilet paper or paper towels
Transparent tape or masking tape
White glue
Poster paint or colored tissue paper
Construction paper, crepe paper, yarn, or pipe cleaners, as desired
Sturdy string
Hard candy and small toys, as desired
Time: About 2 to 4 hours, plus 2 to 3 days drying time
Use a large balloon to build the piñata on, roughly the same shape you want the piñata to be. Use a round balloon for a round fruit or vegetable or a funny head; use a long balloon for a plane or ship. Make sure you get a balloon large enough to hold candy for the whole party; a diameter of 12 inches is usually adequate. To make a head, if you need one, get a 6 1/2-inch balloon. Just in case, get at least one extra balloon in each size.
Making the Papier-Mâché
The piñata is built up of papier-mâché strips smoothed over the balloon. Before you blow up the balloon, cut or tear newspaper into 1 1/4-inch-wide strips. Prepare more strips than you think you'll need; the balloon must be covered with several layers of paper. Spread newspaper on your work surface to protect it.
When you have enough newspaper strips, make a flour and water paste for the papier-mâché. Mix 1/4 cup of flour and 1 cup of cold water, pressing out all lumps; set it aside. Measure 5 cups of water into a saucepan and bring the water to a boil. Add a spoonful of boiling water to the flour-and-water paste, and stir to mix well; then, stirring constantly, slowly pour the paste mixture into the boiling water. Lower the heat and simmer for 2 to 3 minutes, stirring occasionally. Let the mixture cool.
Making the Piñata Base
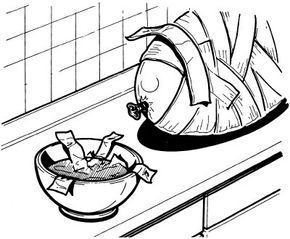
When the paste mixture is cool, blow up the balloon and close the opening firmly. If you have a bowl larger than the balloon, set the balloon into it to contain the mess.
To make a piñata with arms and legs, use cardboard tubes from rolls of toilet paper or paper towels. Cut the tubes to the desired length and tape them into place on the balloon with transparent tape or masking tape. Make sure they're anchored firmly.
To make a head for the piñata, if desired, use a small balloon, about 6 1/2 inches in diameter. Blow up the balloon and close the opening firmly. Set the small balloon into a separate bowl, and build it separately from the body. To make the head for a long-headed animal with an open mouth, such as a horse or a dog, use a toilet paper tube as a base for the papier-mâché, as described below. Add a cardboard tube to the body balloon for a neck, if desired.
Applying the Papier-Mâché
When the base of the piñata is prepared, apply the papier-mâché. Working with one strip of paper at a time, soak precut strips of newspaper in the cooled paste and smooth them onto the balloon body. Soak each strip of newspaper liberally; the paper must be thoroughly wet. Wipe off excess paste with your fingers, and smooth the wet strip onto the balloon for the piñata's body.
Repeat, soaking strips of paper and smoothing them on, to cover the entire balloon with a two-thickness layer of overlapping newspaper strips; crisscross the strips around the balloon, overlapping them about 1 inch. Leave the tied end of the balloon uncovered. If the piñata has arms and legs, cover the tubes with strips long enough to run the entire length of the tube and overlap onto the balloon; build up the tubes to the desired shape. If the ends of the strips start to come up, apply more paste and smooth them down again.
When the entire body balloon is covered with newspaper strips, cover the head balloon. Use the same technique, soaking strips of paper and smoothing them on, to cover the entire balloon with two overlapping thicknesses of paper.
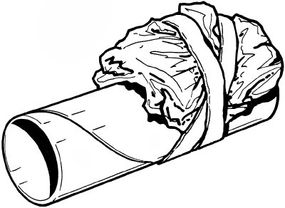
To make the head for a long-headed animal, flatten a toilet paper tube to an oval. Crumple strips of newspaper and soak them liberally in the paste; attach them to the tube with long uncrumpled strips to build up the top of the head. Add more crumpled newspaper, attached with long strips, to build the head to the desired shape; leave one end of the flattened tube open for the mouth. To complete the head, dip your fingers into the paste and apply a light coating of paste to the built-up head, smoothing the strips as you go.
For a long-headed animal, build up the head with crumpled papier-mâché strips on a cardboard tube. Attach the crumpled strips to the tube with long strips, smoothing them around and over the built-up head.
Let the piñata body and head dry completely. For a stronger piñata, let the body and head dry for several hours, until the papier-mâché is stiff. Then apply another double thickness of paste-soaked strips, smoothing strips over the balloons as above; mix more paste as necessary. Let the completed piñata body and head dry for 2 to 3 days, to make sure the papier-mâché is brittle.
Decorating the Piñata
When the piñata is completely dry, put it together and decorate it. At the open end of each hardened balloon, pop the balloon and pull it out through the hole. With a sharp-pointed serrated knife, carefully cut a small hole -- about 2 inches in diameter -- in the piñata body, to attach the head; if you made a neck, this isn't necessary. Cut a corresponding hole in the head where it should join the body or neck. Don't assemble the piñata yet; you'll need the hole left by the balloon, or the head or neck opening, to fill the piñata.
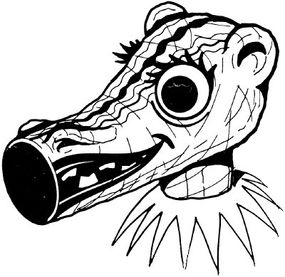
Decorate the piñata -- and, if required, the head -- with poster paint, or cover it with layers of colored tissue paper. Add construction-paper ears or wings, crepe paper streamers, or yam or pipe cleaner tails, whiskers, or hair -- use your imagination. If the piñata head has an open mouth, paint the inside of the mouth black; if it doesn't, paint on a smile or a big-toothed grin. Let the paint dry.
Paint the completed head with poster paint; add construction-paper eyelashes or any yarn, crepe paper, pipe cleaner, or other decorations. Paint the inside of the mouth black. When the paint is dry, attach the head.
Finishing the Piñata
Before filling the piñata, carefully punch a small hole on each side of its top; use an ice pick, and be careful not to crush the papier-mâché. Thread a long piece of sturdy string through the holes to hang the piñata. Then fill the piñata -- and, if it's hollow, the head -- with hard or wrapped candy and small toys. Attach the head to the body with white glue; set it firmly into place, using glue liberally. Let the assembled piñata dry completely.
At party time, hang the piñata from a tree limb or rafter -- keep it low enough to be reached. Blindfold each child in turn, and give him or her a light bat or a stick; turn him around three times and then send him toward the piñata. Only one child will break the piñata, but they'll all get the prizes.
Another fun project to do with kids is to make a jigsaw puzzle. See the next page to learn how.
For more information on do-it-yourself projects, try the following links:
How to Choose Toys for a Child: Here you will learn about which toys are beneficial for stimulating your child’'s growth and development and which toys can be dangerous.
How to Mend Clothes: In this article, you will learn how to make your child’s clothes last just a little bit longer by mending them yourself.
Consumer Guide: Educational Electronic Toys: Read Consumer Guide’'s reviews of the electronic toys that are available for your child.
How to Make a Jigsaw Puzzle
Jigsaw puzzles are almost as much fun for adults to make as they are for kids to play with. Choose your subject and cut the pieces to match the user's skill.
Tools:
Advertisement
Sharp craft knife
Fretsaw or power jigsaw
Fine-toothed flat file
Materials:
Picture (cartoon, photograph, magazine picture, or other illustration)
1/8-inch or 1/4-inch hardboard or plywood
Newspaper
Spray white shellac or polyurethane varnish
Time: About half an hour to 1 hour for a simple puzzle
Attaching the Picture
Any picture you like can be turned into a jigsaw puzzle -- a cartoon, a photograph, a magazine picture, or any illustration. Use a piece of 1/8-inch or 1/4-inch hardboard or plywood to back the picture. Trim the picture and cut the backing hardboard or plywood to the desired size, so that the picture and the backing are the same size.
Spread newspaper to protect your work surface. Place the hardboard or plywood face up on the newspapers, and the picture face down. With a spray can of white shellac or polyurethane varnish, apply a thin coat of shellac or varnish to the back of the picture and the front of the board.
Let the varnish get slightly tacky. Then, working quickly, carefully align the picture on the board, and press the two together. Smooth the picture onto the board, removing all air bubbles. Spray another coat of white shellac or varnish onto the bonded picture. Let the shellac or varnish dry completely, following the manufacturer's instructions.
Cutting the Puzzle
The maximum size of the puzzle depends on the capacity, or throat, of the saw you use to cut it; use a fretsaw for simple puzzles, a power jigsaw for more complicated ones. Use the thinnest saw blade, with the greatest number of teeth per inch, you can find; the finer the blade, the smoother the edges on the puzzle pieces.
Cut the puzzle into interlocking pieces, keeping in mind the ability of its intended user. To make large puzzles easier to handle, cut them into quarters before cutting the puzzle pieces. After cutting, check the pieces for rough edges; file any rough edges smooth with a fine-toothed flat file.
Another fun toy you can make for your kids is wooden blocks. Learn how on the next page.
For more information on do-it-yourself projects, try the following links:
How to Choose Toys for a Child: Here you will learn about which toys are beneficial for stimulating your child’'s growth and development and which toys can be dangerous.
How to Mend Clothes: In this article, you will learn how to make your child’'s clothes last just a little bit longer by mending them yourself.
Consumer Guide: Educational Electronic Toys: Read Consumer Guide’'s reviews of the electronic toys that are available for your child.
How to Make Wooden Blocks
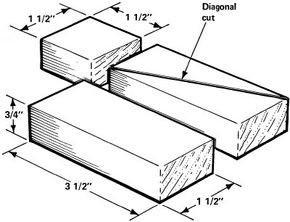
Cut 1 1/2-inch pieces of 1 x 2 for square blocks, and 3 1/2-inch pieces for long blocks; cut some in half along the grain to make narrow blocks. For triangles, cut 3 1/2-inch blocks in half diagonally.
Wood building blocks are an all-time favorite toy, and there usually aren't quite enough to go around. With just a little effort, you can make a set of blocks for every kid in the house.
Tools:
Advertisement
Measuring rule
Pencil
Carpenters' square
Saber saw, or miter box and backsaw
Coping saw
Vise
Compass
If desired, drill
Small paintbrush
Materials:
1 x 2 clear pine stock
1-inch wood dowel
If desired, 1 x 3 or 2 x 2 clear pine stock, and/or 3/8-inch wood dowel
Medium- and fine-grit sandpaper
If desired, nontoxic, child-safe gloss paint
Time: About 3 to 4 hours; if desired, additional time for painting
Making the Blocks
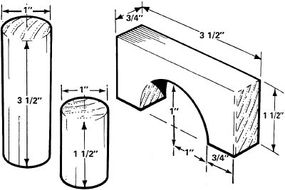
To make blocks for a small child, use 1 x 2 clear pine stock. The actual size of 1 x 2 is 3/4 x 1 1/2 inches, so the finished blocks will be 3/4 inch thick, and either 3/4 inch or 1 1/2 inches wide. Use pieces of 1-inch wood dowel to cut short and long columns.
If you want larger blocks, cut them from 1 x 3 clear pine stock, for an actual width of 2 1/2 inches. Or, for square alphabet-type blocks, cut 1 1/2-inch-long pieces of clear 2 x 2 pine stock. The dimensions below are for 1 x 2 stock; modify your cutting as desired for larger or thicker blocks.
To make the blocks, measure and mark the desired length on a piece of wood; use a carpenters' square to make sure the ends are square. Mark and cut one block at a time. Clamp the piece of wood in a vise and cut each block with a saber saw; or use a miter box and a backsaw to keep the ends even. After cutting all desired blocks from the 1 x 2, cut them in half as required; then cut special shapes and pieces of dowel for columns.
Planning a Block Set
For a 58-piece block set, cut 1 x 2 and dowel pieces as detailed below.
Measure and cut 14 pieces of 1 x 2 to be 3 1/2 inches long, to make 1 1/2 x 3 1/2-inch blocks. Measure and cut four pieces 3 1/2 inches long, to be cut in half. Set them aside.
Measure and cut 14 pieces of 1 x 2 to be 1 1/2 inches long, to make 1 1/2-inch-square blocks. Measure and cut four pieces 1 1/2 inches long, to be cut in half. Set them aside.
Mark four 3 1/2-inch-long pieces in half the long way, and carefully cut them in half to make eight 3/4 x 3 1/2-inch blocks.
Mark four 1 1/2-inch pieces in half along the grain of the wood, and carefully cut them in half to make eight 3/4 x 1 1/2-inch blocks.
At this point, you should have a total of 28 full-width blocks and 16 half-width blocks.
Next, make special shapes.
Measure and cut two 3 1/2-inch-long pieces of 1 x 2, to make four triangles from two 1 1/2 × 3 1/2-inch blocks. On each block, draw a diagonal line between two opposite corners; carefully cut along the line to make two 3 1/2-inch-high triangles.
Measure and cut two 3 1/2-inch-long pieces of 1 x 2 to make arches. For each arch, use a compass to draw a 1-inch-radius semicircle at the center of one long edge, to form a
1-inch-high arch on one long side. Clamp the block firmly and then carefully cut the arch with a saber saw or a coping saw.
After cutting the triangles and arches, cut pieces of 1-inch wood dowel to make columns. Measure and cut four pieces 3 1/2 inches long and four pieces 1 1/2 inches long.
Cut 1 1/2-inch and 3 1/2-inch pieces of 1-inch mood dowel to make columns. For arches, use long blocks: draw a 1-inch-radius semicircle on the edge of the block, clamp the block firmly, and cut out the marked arch.
Besides the 44 plain blocks, you should now have 14 special shapes, for a total of 58 blocks. If desired, add connector pieces of 3/8-inch or smaller wood dowel to make a fit-together construction set.
For connectors of various lengths, cut 10 to 15 dowels each, 2 inches, 4 inches, 6 inches, and 8 inches long.
On the faces and around the edges of the blocks, about 1/2 inch apart, drill 3/8-inch holes about 1/4 to 3/8 inch deep. Don't drill more than two holes along the side of a 1 1/2-inch-wide block.
Finishing the Blocks
To finish the blocks, sand all edges, all corners, and all surfaces; use first medium-grit and then fine-grit sandpaper. The blocks must be very smooth; they may end up in a child's mouth. Make sure you remove all rough spots and all splinters. Remove all dust before the blocks are used.
If desired, paint the blocks -- a solid color, different colors on opposite sides, or, for square blocks, with pictures and letters of the alphabet. Use only non-toxic, child-safe gloss paint; the container should clearly state that the paint is a dry-film, baby-safe type. Apply the paint and let it dry completely before the blocks are used, as directed by the manufacturer.
To use your woodworking skills on another fun toy for children, see the next page for instructions on how to make a rocking horse.
For more information on do-it-yourself projects, try the following links:
How to Choose Toys for a Child: Here you will learn about which toys are beneficial for stimulating your child’'s growth and development and which toys can be dangerous.
How to Mend Clothes: In this article, you will learn how to make your child’s clothes last just a little bit longer by mending them yourself.
Consumer Guide: Educational Electronic Toys: Read Consumer Guide’'s reviews of the electronic toys that are available for your child.
How to Make a Rocking Horse
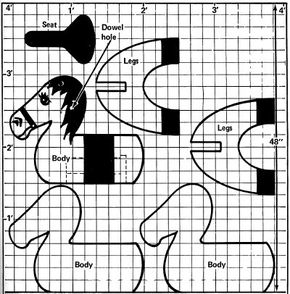
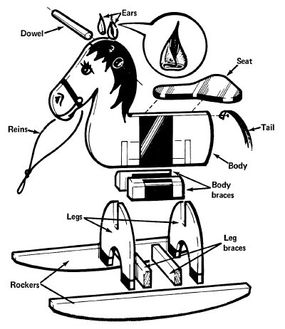
On brown paper, draw a 48-inch-square grid of 2-inch squares; draw the pieces of the horse's body and legs on the grid as shown. Cut out the pattern pieces and trace each piece onto a sheet of 3/4-inch plywood.
Toddlers love to rock, and this wooden rocking horse is as much fun to use as it is to build. Give your imagination free rein when you build this fantasy friend.
Tools:
Advertisement
Measuring rule
Pencil
Ruler
Straightedge
Scissors
Saber saw
Weights or clamps
Wood file
Drill
Countersink
Screwdriver
Brace and bit
Compass
Paintbrushes
Hammer
Materials:
Brown paper
3/4-inch grade A-B plywood
Carpenters' glue
2 x 4 and 2 x 6 pine stock
2-inch #12 flathead wood screws
1 1/2-inch #10 flathead wood screws
1-inch wood dowel
Wood filler
Primer and nontoxic, child-safe gloss paints
Leather strips and scraps
1-inch and 1/2-inch studs
Time: About 2 days
Cutting the Pieces
On a large sheet of brown paper, at least 48 inches square, use a pencil, ruler, and straightedge to mark off a 24 x 24-square grid of 2-inch squares. Using the cutting diagram illustrated, transfer the pattern for the rocking horse pieces onto your grid, and cut them out. For the seat and legs, trace only half of the pattern; then fold the traced piece over and cut it double-thickness, to ensure that the two halves of each piece will be symmetrical.
Use the paper patterns to trace each piece onto 3/4-inch grade A-B plywood. Use a saber saw to cut out the three pieces of the head and body, the two leg pieces, and the seat.
Stack the three head/body pieces to check them for fit; minor differences can be smoothed later. Apply carpenters' glue liberally between the three pieces, and weight or clamp the pieces together. Let the clamped pieces dry overnight.
Assembling the Horse
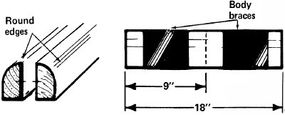
To assemble the horse, cut a 2 1/4 x 5-inch slot in each of the leg pieces to lock the legs onto the body. Cut two 9-inch-long body braces from 2 x 4 pine stock. Use a wood file to round one long edge of each brace.
To brace the legs where they lock into the body, cut two 9-inch pieces of 2 x 4. Round one long edge of each body brace with a wood file.
Temporarily align the legs on the head/body pieces with a body brace between them; the top rounded edge of the body brace should be even with the tops of the legs. Apply glue to the side of the brace that will butt against the body of the rocking horse. Drill and countersink three holes -- two 1 1/2 inches from each end of the body brace and one centered between them -- for two 2-inch #12 flathead wood screws. Drive the screws through the brace to secure it to the horse's body. Repeat to secure the other body brace to the other side of the body.
Cut two 16-inch-long leg braces from 2 x 4 stock. Apply glue to one 2 x 4 brace where it butts with the bottom of a leg piece; the bottom edges of the brace and the leg must be flush. Drill and countersink two holes through each of the leg braces for two 2-inch #12 flathead wood screws. Drive the screws through the brace to secure it to the leg piece. Repeat to secure the other leg and leg brace.
Apply glue to the edges of the slot on the front leg piece and to the point where the leg will butt against the front end of a body brace; slip the front leg piece, brace facing to the rear, into place. Drill and countersink two holes through the front leg piece on both sides for two 1 1/2-inch # 10 flathead wood screws, and drive the screws to secure the legs to the brace. Repeat to attach the rear legs; place the leg brace facing forward.
Making the Rockers
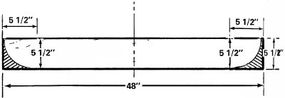
To make the rockers, cut two 48-inch pieces of 2 x 6 pine stock. Use a compass to shape each end of each piece to the curve of a 5 1/2-inch-diameter circle, so that the rockers curve up to a point at each end.
To make the rockers, cut two 48-inch pieces of 2 × 6. Shape the ends of the pieces to a smooth curve, so that the assembled horse will rock evenly.
Align and center a rocker against the leg pieces on one side of the horse. Apply glue to the ends of the leg braces and the bottom part of the edges of the legs, and fasten the rocker to the legs. Drill and countersink two holes through the rocker at each point where it butts against the leg braces, for two 2-inch #12 flathead wood screws. Drive the screws through the rocker and into the leg braces.
Align the second rocker so that it matches the first one. Glue the rocker into place and secure it with wood screws, as above.
Adding the Handle
Use a brace and bit to bore a 31/32-inch hole into the head, as indicated on the cutting diagram, for the handle. Cut a 10 inch-length of 1-inch dowel, and hammer the dowel into the hole until an equal length is on both sides.
Attaching the Seat
Apply glue to the top edge of the back of the rocking horse, and set the seat into place. Drill and countersink two holes through the seat near each end for two 2-inch #12 flathead wood screws. Drive the screws through the seat and into the back to secure the seat.
Finishing the Horse
To finish the horse, fill all countersunk screw holes and any imperfections with wood filler. Use a wood file to round all rough or sharp edges, including the exposed ends of the dowel through the head. Sand the entire rocking horse smooth.
Apply a coat of primer to the entire horse and let it dry, as directed by the manufacturer. Apply two coats of paint to the horse; use nontoxic child-safe gloss paint, specified as dry-film, baby-safe. Let the paint dry thoroughly between coats. Paint the body and the details whatever colors you like -- use your imagination to paint the horse's mane, saddle, cinch, eyes, nose, and nose rein.
When the paint is completely dry, cut two 30-inch strips of leather for the reins. Attach one strip to each side of the head with 1-inch-diameter studs. Tie the other ends of the strips together and rest them on the handles.
Cut random lengths of leather for the tail. To attach each strip, pin one end of the strip through a 1/2-inch stud and hammer the stud into the rear of the horse.
To make the ears, cut two equal triangles from a 6-inch square of leather. For each ear, fold two corners of a triangle over so they overlap slightly, and secure the ear to one side of the head with a 1/2-inch stud.
Assemble the horse as shown: lock the legs into place and brace them at the body and across the bottom; attach the rockers and the seat, slide the dowel through the drilled dowel hole, and add reins and tail.
Another fun toy you can build for children is a sandbox. See the next page for instructions.
For more information on do-it-yourself projects, try the following links:
How to Choose Toys for a Child: Here you will learn about which toys are beneficial for stimulating your child’'s growth and development and which toys can be dangerous.
How to Mend Clothes: In this article, you will learn how to make your child’s clothes last just a little bit longer by mending them yourself.
Consumer Guide: Educational Electronic Toys: Read Consumer Guides’s reviews of the electronic toys that are available for your child.
How to Make a Sandbox
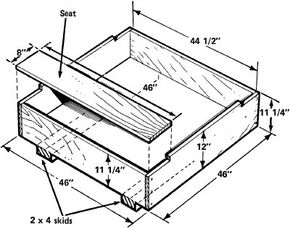
The pieces of the sandbox are cut from 3/4-inch exterior plywood; for added water resistance, the box rests on 2 × 4 skids. Two eight-inch-wide seats are set into the sides; the end panels are notched so that all top eges are flush.
For a favorite all-summer-long toy, build this sturdy, well-put-together covered sandbox.
Tools:
Advertisement
Measuring rule
Pencil
Carpenters' square
Straightedge
Power saw
Hammer
Drill
Screwdriver
Plane
Sanding block
Fine-toothed flat file
Paintbrush
Materials:
3/4-inch grade A-B or B-B exterior plywood
2 x 4 and 1 x 2 pine stock
6-penny common nails
1 1/2-inch #8 flathead galvanized or brass wood screws
Six utility strap hinges and four utility handles with machine screws, washers, and nuts
Sandpaper
Primer and latex or oil-base exterior trim paint or porch and floor enamel
Time: About 5 to 6 hours, plus finishing time
Cutting the Pieces
To make the sandbox, use 3/4-inch grade A-B or B-B exterior plywood. Be sure to make allowances for the width of saw cuts between pieces, and remember that plywood sheets may not measure exactly 4 x 8 feet.
Measure, mark, and cut a bottom panel for the sandbox, 44 1/2 inches square. Cut two pieces of 2 x 4 pine stock, 46 inches long, for skids under the sandbox; angle-cut all four ends of the 2 x 4's to about 25 degrees.
Attaching the Skids
Lay the 2 x 4's parallel on a flat surface, and place the bottom panel of the sandbox on top of them, with two sides of the panel parallel with the skids. Adjust the skids so that they lie 12 inches in from each side of the bottom; set the skid ends equidistant with the edges of the bottom panel. Tack the skids into place temporarily with two 6-penny common nails driven only partway in.
Turn the bottom panel over. Drill a series of 11/64-inch holes, about 12 inches apart, through the plywood bottom panel, for screws to secure the skids. Drill only through the plywood bottom panel; do not drill into the skids. Attach the skids to the bottom panel with 1 1/2-inch #8 flathead galvanized or brass wood screws, driven through the bottom panel and into the skids. Set the screw heads flush with the surface of the wood. Turn the assembly over and remove the 6-penny nails.
Making the Sides of the Box
To make the sides of the box, cut two 12 x 46-inch plywood pieces and two 11 1/4 x 44 1/2-inch plywood pieces. At the upper corners of the 12 x 46-inch pieces, cut notches 8 inches long and 3/4 inch deep, to accommodate the sandbox's seat boards.
Set the two 11 1/4 by 44 1/2-inch pieces at opposite ends of the bottom panel; make sure the ends are flush with the open edges of the panel and the bottom edge is flush with the underside of the panel. Tack each end piece into place temporarily with two 6-penny nails driven only partway in.
Drill a series of 11/64-inch holes, about 8 inches apart, near the bottom edge of these end pieces. Drill only through the end pieces; do not drill into the bottom panel. Fasten the end pieces to the bottom panel with 1 1/2-inch #8 flathead wood screws, driven through the faces of the end pieces into the bottom panel. Set the screw heads flush.
Following the same procedure, attach the two 12 x 46-inch pieces to the other two edges of the bottom panel. Drill holes for three additional screws through the ends of these pieces; drive the screws into the ends of the 11 1/4 x 44 1/2-inch pieces. Set the screw heads flush. Remove all temporary 6-penny nails.
Making the Seats
To make the sandbox seats, cut two 8 x 46-inch pieces of plywood. Set the seats into the notches cut in the end pieces. Drill 11/64-inch holes every 8 inches along each seat, through the seat only. Secure the seats with 1 1/2-inch #8 flathead wood screws, driven through the faces of the seats into the ends of the sandbox. Set the screw heads flush.
Making the Cover
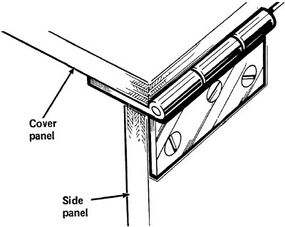
For the sandbox cover, cut two 23 x 46-inch pieces of plywood. Attach three utility strap hinges to the outside edge of each piece. Using the hinges as templates, mark the locations for screw holes. Drill holes for the hinge screws through each cover piece. Secure the hinges with machine screws, washers, and nuts, with the screw heads to the inside of the sandbox and the nuts on the outside.
Make a two-piece cover to protect the sandbox. Attach each cover panel to the side of the box with utility hinges, set with one hinge leaf on the outside of the side panel and the other on the bottom of the cover. Secure the hinges with machine screws.
Mark the locations for screw holes for two utility handles near the inside edge of each cover piece. Drill holes for the handles' screws through each cover piece. Attach the handles, using machine screws, washers, and nuts.
Attach a strip of 1 x 2 pine stock to the meeting edge of one cover piece so that it will overlap the other piece when closed to seal out rainwater. Fasten the strip with 1 1/2-inch #8 flathead wood screws.
Finishing the Sandbox
To finish the sandbox, carefully round and bevel all corners and edges with a plane, a sanding block, or a fine-toothed flat file. Pay particular attention to the seat boards and the upper edges of the sides. Check for splinters or rough spots, and sand as necessary to smooth all surfaces. Finally, apply a coat of primer and at least two coats of exterior latex or oil-base trim paint or porch and floor enamel. Paint the inside, the outside, and the bottom of the sandbox. Let the paint dry completely between coats, as directed by the manufacturer.
For more information on do-it-yourself projects, try the following links:
How to Choose Toys for a Child: Here you will learn about which toys are beneficial for stimulating your child’'s growth and development and which toys can be dangerous.
How to Mend Clothes: In this article, you will learn how to make your child’s clothes last just a little bit longer by mending them yourself.
Consumer Guide: Educational Electronic Toys: Read Consumer Guide’'s reviews of the electronic toys that are available for your child.
Cite This!
Please copy/paste the following text to properly cite this HowStuffWorks.com article: